
Baklava Cheesecake Recipe
Imagine a dessert that combines the flaky goodness of baklava with the creamy texture of cheesecake. Enter this baklava cheesecake recipe, a show-stopping fusion that takes the best of both worlds and creates a decadent treat that’s sure to impress at any gathering. Whether you’re a fan of traditional Middle Eastern desserts or a cheesecake lover looking for something new, this recipe is the perfect way to indulge your sweet tooth.
Growing up, baklava was a staple at every family celebration. My grandmother’s kitchen was always filled with the fragrant aroma of cinnamon and honey as she prepared tray after tray of this beloved treat. Years later, when my cheesecake-loving partner came into the picture, it sparked the idea of combining the two desserts. After a few trial runs, a new family favorite was born, blending our cultural heritage with a modern twist.
MORE OF OUR FAVORITE…
Why You’ll Love This Recipe
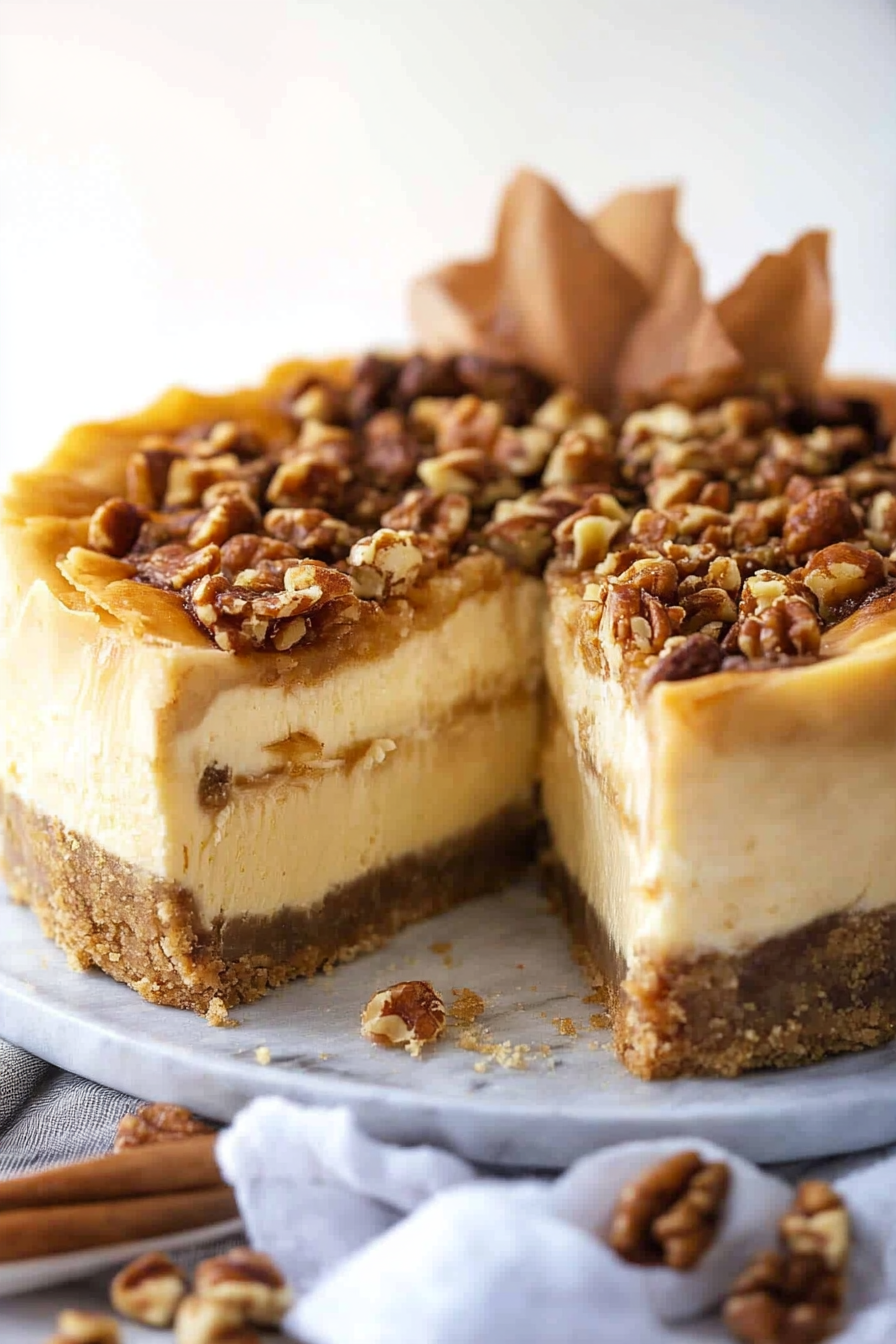
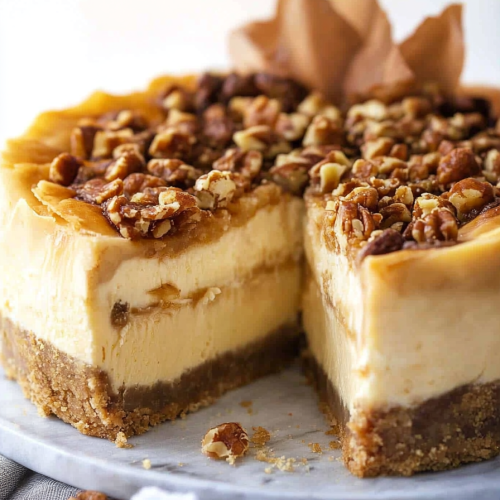
This recipe is a delightful blend of crispy, nutty layers of filo dough with the creamy richness of cheesecake. It’s unique because it brings together two classic desserts into one harmonious slice. Not only is it visually stunning, making it perfect for special occasions, but the combination of textures and flavors will have your guests raving and asking for the recipe.
Ingredients Notes
For this baklava cheesecake, you’ll need a few key ingredients like filo dough, cream cheese, and a mixture of nuts such as walnuts and pistachios. When sourcing, choose high-quality nuts for the best flavor and freshness. If filo dough intimidates you, don’t worry; it can be found in the freezer section of most supermarkets. Allow it to thaw in the refrigerator overnight for easier handling.
Recipe Steps
Step 1
Preheat your oven to 325°F (165°C). Start by preparing the crust. Lay the filo dough sheets in a springform pan, brushing each layer with melted butter. Aim for about 8–10 layers, ensuring they cover the bottom and slightly up the sides.
Step 2
In a bowl, combine finely chopped nuts, cinnamon, and sugar. Sprinkle this nut mixture evenly over the buttered filo base, pressing it gently to adhere to the dough.
Step 3
For the cheesecake filling, beat the cream cheese and sugar until smooth and creamy. Gradually add eggs, one at a time, mixing well after each addition. Pour the cream cheese mixture over the nut-filled base.
Step 4
Bake the cheesecake for about 45 minutes or until the center is set but still slightly jiggly. Allow it to cool completely before refrigerating it for at least 4 hours or overnight for best results.
Step 5
Once chilled, drizzle with a generous amount of honey and sprinkle with additional chopped nuts for the finishing touch. Remove from the pan carefully, slice, and serve this delightful treat to your guests.
Storage Options
Leftover baklava cheesecake can be stored in an airtight container in the refrigerator for up to 5 days. To freeze, wrap individual slices tightly in plastic wrap, then place in a freezer bag. When ready to enjoy, thaw it in the fridge overnight. If you prefer it warm, a few seconds in the microwave will revive its fresh-baked taste.
Variations & Substitutions
For a nut-free version, substitute the nuts with crushed digestive biscuits for a similar texture. If you’re looking to reduce sugar, consider using a sugar alternative suitable for baking. For a rich chocolate twist, add a layer of melted dark chocolate between the filo layers and the cheesecake filling.
Frequently Asked Questions
Can I make this cheesecake in advance? Absolutely! This baklava cheesecake is the perfect make-ahead dessert. It can be prepared up to two days in advance, allowing the flavors to meld beautifully. Store it in the refrigerator, and add the honey and extra nuts just before serving for the freshest taste.
What if I can’t find filo dough? If filo dough is unavailable, you can substitute it with puff pastry for a different yet delicious texture. Note that puff pastry will create a thicker base and may require slightly longer baking time to ensure a crisp finish.
How do I prevent the cheesecake from cracking? To prevent cracking, make sure not to overbeat the cheesecake batter, as this can incorporate excess air. Baking the cheesecake at a low and steady temperature and allowing it to cool in the oven with the door slightly open can also help maintain a smooth top.
Frequently Asked Questions
Baklava Cheesecake Recipe
Ingredients
Main Ingredients
- 16 oz cream cheese softened
- 1 cup sugar
- 1 tsp vanilla extract
- 4 whole eggs large
- 0.5 cup walnuts chopped
- 0.5 cup pistachios chopped
- 1 pack phyllo dough thawed
- 1 cup butter melted
- 0.5 cup honey
Instructions
Preparation Steps
- Preheat the oven to 325°F (165°C) and grease a 9-inch springform pan.
- Beat the cream cheese, sugar, and vanilla extract together in a bowl until smooth.
- Add the eggs one at a time, mixing well after each addition.
- Layer 10 sheets of phyllo dough in the prepared pan, brushing each with melted butter.
- Pour half of the cheesecake mixture over the phyllo layers and sprinkle half the nuts.
- Repeat the layering with the remaining cheesecake mixture and nuts.
- Bake in the preheated oven for 60 minutes or until the center is set.
- Drizzle honey over the cheesecake while warm and let it cool to room temperature.